Make a BIDS app from your Dockerfile
BIDS apps are “portable neuroimaging pipelines that understand BIDS datasets”. BIDS, short for Brain Imaging Data Structure**, is a specification on how to organize and describe neuroimaging datasets, aimed at improving data sharing practices and reproducibility in science (just like Porcupine!). BIDS apps further improve reproducibility by offering containerized analysis pipelines operating on BIDS-formatted datasets.
Given that Porcupine generates both a pipeline-script (a Python script in the case of Nipype-based pipelines) and a complementary Dockerfile, it is relatively straightforward to convert your pipeline in a BIDS app! It only takes a few edits to the Dockerfile and your Porcupine-generated pipeline-script.
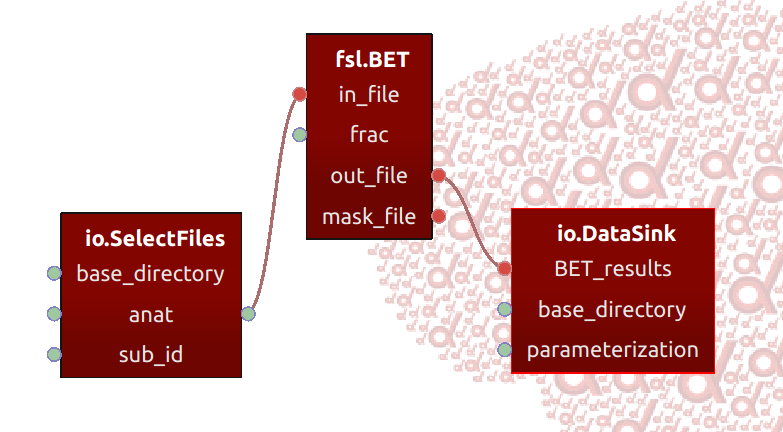
We will describe how to convert Porcupine-pipelines to BIDS apps by walking you through the process of converting our simple example from our example-gallery, a basic skullstripping workflow, to a BIDS app.
Making your Porcupine-pipeline “container-aware”
First of all, your pipeline should run in a “container-aware” manner. That is, your pipeline should be adapted at runtime depending on the arguments given by the user. BIDS apps require at least three (mandatory) positional arguments:
input_dataset: the folder containing the BIDS-formatted dataset;output_folder: the folder where the results will be stored;analysis_level: the stage of the analysis performed
(For more information, check out the BIDS app article!)
Additionally, BIDS apps allow other (optional) arguments. In our example, we could
for example make the “fractional intensity threshold” of the
FSL skullstripping algorithm “BET” an optional parameter of our BIDS app. Another
often-used optional parameter is participant_label, which specifies the particular
subject(s) to be processed using the app. With all parameters, it is thus important that
our pipeline should be able to flexibly adjust its nodes/ports according to the
arguments given by the user.
To do so, we can simply use variables as values for the specific ports in our
pipeline (like the port frac in our BET-node), which we will assign a
specific value depending on the user input (using e.g. Argparse, as explained
in the next paragraph). For our three nodes (SelectFiles for input, BET for
the skullstripping operation, and DataSink to write the results back to disk),
we could set the ports as follows:
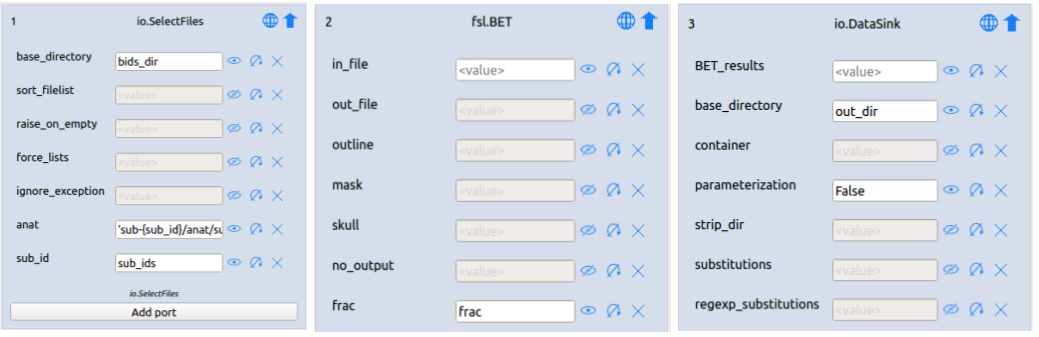
As you can see in the the image above, we use variables as values for
the ports of our nodes (e.g. bids_dir for the base_directory port of SelectFiles).
But how do we map the input of the user to the variables? To achieve that, we
need to add some code to the Python-script!
Modifying your Python-script
To parse the arguments given by the user, we’ll adopt the approach used in the
example BIDS app provided by the BIDS
apps developers. In fact, we can almost exactly copy-paste their code for
parsing the arguments (using the Argparse library).
parser = argparse.ArgumentParser(description='Example skullstripping BIDS App entrypoint script.')
parser.add_argument('bids_dir', help='The directory with the input dataset '
                    'formatted according to the BIDS standard.')
parser.add_argument('output_dir', help='The directory where the output files '
                    'should be stored. If you are running group level analysis '
                    'this folder should be prepopulated with the results of the'
                    'participant level analysis.')
parser.add_argument('analysis_level', help='Level of the analysis that will be performed. '
                    'Multiple participant level analyses can be run independently '
                    '(in parallel) using the same output_dir.',
                    choices=['participant', 'group'])
parser.add_argument('--participant_label', help='The label(s) of the participant(s) '
                   'that should be analyzed. The label '
                   'corresponds to sub-<participant_label> from the BIDS spec '
                   '(so it does not include "sub-"). If this parameter is not '
                   'provided all subjects should be analyzed. Multiple '
                   'participants can be specified with a space separated list.',
                   nargs="+")
parser.add_argument('--frac', default=0.3, type=float, dest='frac',
                    help='Fractional intensity threshold parameter for FSL BET')
Now, we add some code to actually parse the arguments and “map” them to our
pipeline by storing the values in the values we specified for our nodes
(e.g., the frac for BET, and the bids_dir variable for SelectFiles):
args = parser.parse_args()
bids_dir = args.bids_dir
out_dir = args.output_dir
frac = args.frac

# Extract sub_ids for SelectFiles
if args.participant_label:
    sub_ids = args.participant_label
# for all subjects
else:
    subject_dirs = glob(os.path.join(args.bids_dir, "sub-*"))
    sub_ids = [subject_dir.split("-")[-1] for subject_dir in subject_dirs]
Adding the above to your Python-script will enable you to run your pipeline with
specific parameters for bids_dir, output_dir, participant_label, and frac!
(Note that we do not use the analysis_level argument here, because it’s irrelevant
for such a simple skullstripping workflow.) You could for example run the pipeline
for participants 01, 02, and 03 with the frac parameter set to 0.4 as follows:
$ python skullstrip.py /home/user/my_bids_data /home/user/outputs participant --frac 0.4 --participant_label 01 02 03
However, this does not run your pipeline in a Docker container. To do so, we need to edit the Porcupine-generated Dockerfile slightly.
Warning! Make sure you make your make your Python-script executable
(i.e. on Linux/Mac: chmod +x skullstrip.py) before building your Docker image,
otherwise you’ll get a “permission denied” error when running your image!
Modifying your Dockerfile
In Porcupine-generated Dockerfiles, you can adapt it to your pipeline by
adding it to the Docker image (by the ADD command) and calling it during
runtime (by the CMD command). To make it compatible to BIDS-apps, we only need
to change the CMD command to an ENTRYPOINT command. Suppose our Porcupine-generated
Python-script is named skullstrip.py, we only need to change CMD ["python", "/skullstrip.py"]
to ENTRYPOINT ["/skullstrip.py"]. In other words, the last three lines of your
Dockerfile should be something like:
ADD skullstrip.py /skullstrip.py
ENTRYPOINT ["/skullstrip.py"]
Now, you can run your skullstrip pipeline as a proper BIDS app in a Docker container by running the following command in your pipeline (which should include a mapping of your bids-folder and output-folder to the Docker image!):
$ docker run --rm -v /home/user/bids_data_dir:/data:ro -v /home/user/outputs:/out skullstripimage /data /out participant --frac 0.4 --participant_label 01 02 03
If you want to check out the Porcupine-pipeline and corresponding Python-script and Dockerfile, you can download them below!