Reading and writing files with Nipype
The first thing you likely want to do in building a pipeline is selecting the files
that you want to work with. Nipype has several interfaces that you could use for this,
like the SelectFiles, the DataGrabber, or the S3DataGrabber. The first two
get data from disk directly based on a template, the third one collects data from an online (Amazon) repository, a so-called s3-bucket.
We highly recommend to use the SelectFiles interface to select files for
your pipeline, because it is easier (and more intuitive) to use than the
DataGrabber interface. In this section, we’ll showcase how to use SelectFiles
nodes in your Porcupine pipeline to select files from disk and, at the end
of your pipeline, how to use Nipype’s DataSink interface to appropriately
write results to disk.
Scenario sketch
Before we explain how to use SelectFiles and DataSink, let’s sketch out a scenario.
Suppose a researcher has a (BIDS-formatted) dataset,
consisting of structural MRI-scans (a single T1-weighted scan) and functional
MRI-scans (two runs of fMRI acquisition during a nback-task) of 10 subjects.
This data may be stored in the researcher’s home-directory of his/her laptop,
in the folder ~/data, which is organized as follows:
~/data
├── sub-01
│   ├── anat
│   │   └── sub-01_T1w.nii.gz
│   └── func
│       ├── sub-01_task-nback_run-1_bold.nii.gz
│       ├── sub-01_task-nback_run-2_bold.nii.gz
├── sub-02
│   ├── anat
│   │   ├── sub-02_T1w.nii.gz
│   └── func
│       ├── sub-02_task-nback_run-1_bold.nii.gz
│       ├── sub-02_task-nback_run-2_bold.nii.gz

...

└── sub-10
    ├── anat
    │   └── sub-10_T1w.nii.gz
    └── func
        ├── sub-10_task-nback_run-1_bold.nii.gz
        └── sub-10_task-nback_run-2_bold.nii.gz
Using Porcupine, this researcher wants to implement a simple pipeline that calculates a registration for each functional file from functional space to T1-space. Accordingly, the workflow needs to do the following (for each subject):
- Skullstrip the T1-scan
- Extract the first volume of each functional scan
- Register each volume to the skullstripped T1-scan
We’ll use this hypothetical pipeline to walk you through file I/O in
Porcupine using SelectFiles (for selecting files from disk) and DataSink
(for writing files to disk) in the rest of this section of the documentation.
Using the SelectFiles interface in Porcupine
In this section, we’ll walk you through increasingly complex uses of the
SelectFiles interface to select files for Porcupine pipelines.
A simple example: selecting a single file
Now, let’s start simple: suppose we want to select just one file - the T1-scan
from subject 1 (sub-01) for the skullstripping part of our pipeline (we’ll extend
the pipeline with the registration-part in the following examples). We’ll
create a SelectFiles node in Porcupine, but you’ll notice that it doesn’t list
any output-ports in the workflow and node editor! This is because SelectFiles
expects you to create the output-ports yourself (this refers to Nipype’s
“dynamic ports” construct; you can read more on this in the
corresponding section of the documentation).
So, what you have to do is (1) create an output-port manually and (2) link some file(s) to that output-port. To do this, you need to do the following in Porcupine (see also the gif below):
- Click the “Add port” button at the bottom of the node in the node editor
- Enter the name of the new output-port (let’s call it “anat”)
- Select “Both” in the new popup
After doing this, you should now see a “hybrid” input/output-port in the workflow
editor and a new field named “anat” in the node editor! Now you need to tell the
SelectFiles node where it can find the T1-file on disk. To do so, we simply
fill in the path in the “anat” field in the node editor with:
'data/sub-01/anat/sub-01_T1w.nii.gz'
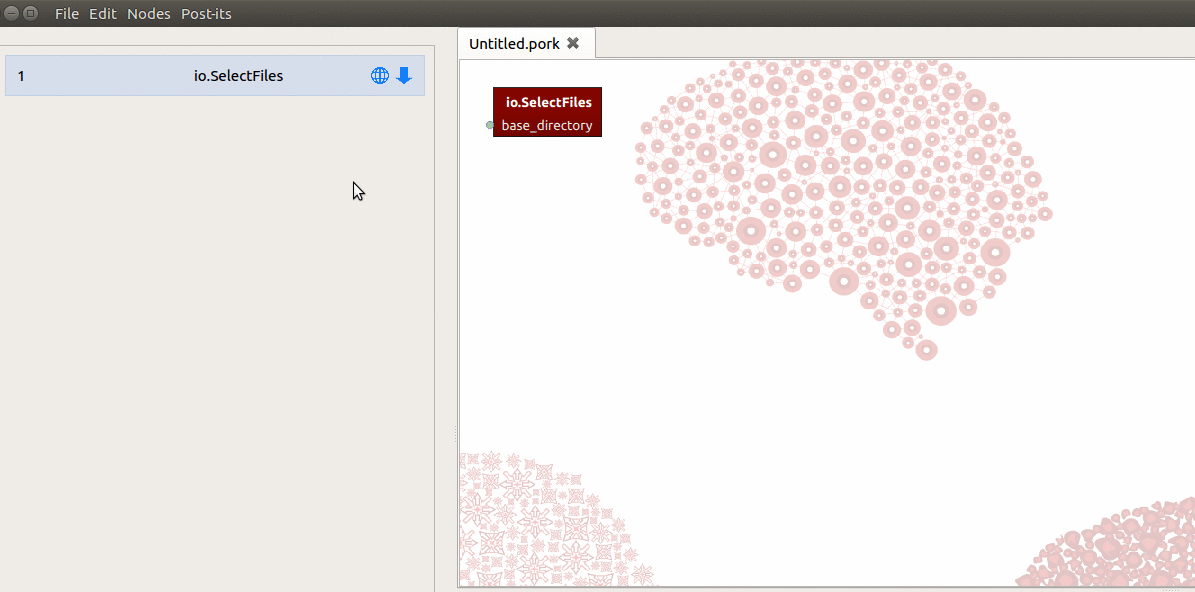
(Note: don’t forget to set the base_directory input-port of SelectFiles if
you don’t specify the absolute path in the value of your “anat” output-port!)
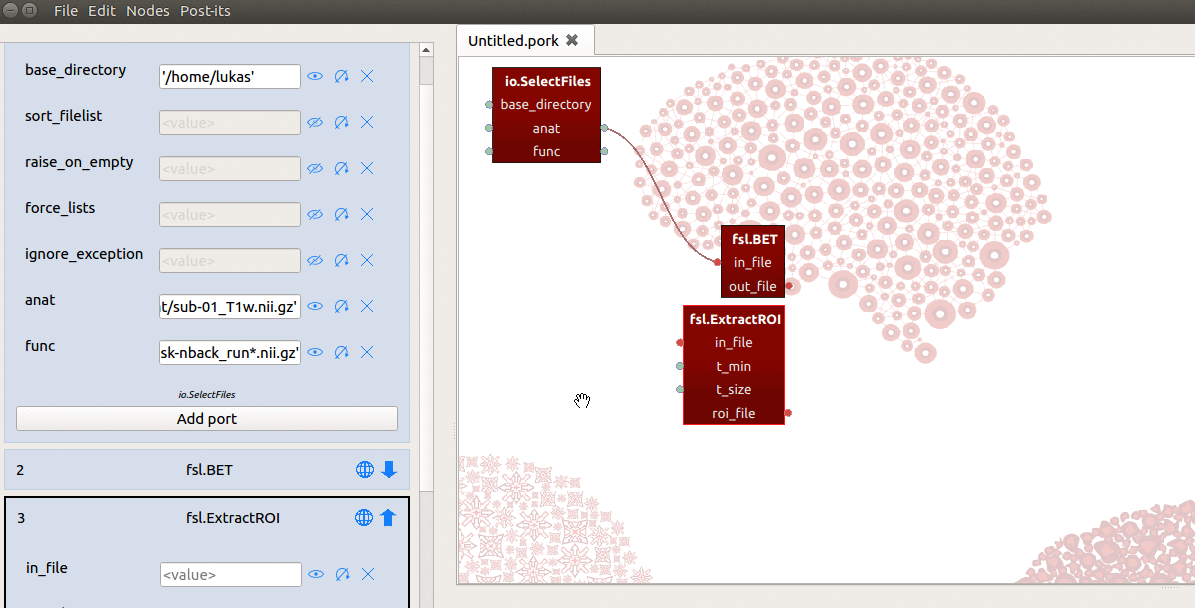
Then, create an FSL BET node for the skullstripping operation and connect
the anat output-port of SelectFiles with the in_file input-port from
the BET node, and done! We have built a fully functioning skullstripping “pipeline”!
Selecting multiple files and iteration
For our registration-pipeline, however, we also need to select the two functional (BOLD) files, from which we need to extract the first volume and subsequently calculate the registration from this volume to the skullstripped T1-file. To do so, we simply add another input/output-port - let’s name this one “func”. This time, we fill in the following in its field:
'data/sub-01/func/sub-01_task-nback_run*.nii.gz'
Now, the “func” output-port of SelectFiles will, upon runtime, contain not
one but a list of two files, namely: sub-01_task-nback_run-1.nii.gz and
sub-01_task-nback_run-2.nii.gz! We can, now, connect the “func” output-port
to the in_file input-port from ExtractRoi node (from fsl.utils)
which will extract the first volume of the func file.
However, the in_file input-port expects not a list, but a single string referring
to the path of a file! To enable ExtractRoi to iterate over this list of inputs
(which turns ExtractRoi into a “MapNode”; see here for more details),
we only need to click the icon with the circular arrow (see gif below) next to
the in_file input-port!
Importantly, we need to enable iteration (by clicking the circular arrow icon)
for every node ‘downstream’ of this “func” output-port! So, suppose we
add an FSL FLIRT node (to calculate the registration from the functional volume
to the skullstripped T1), and connect the roi_file output-port from ExtractRoi
to the in_file input-port from FLIRT. We then also need to make the in_file
input-port iterable! (Otherwise, it’ll crash when receiving a list of two outputs from
the roi_file output-port from the preceding node!)
Alright! Right now, we have a fully functioning registration-pipeline for a single subject that
iterates over two functional files and registers them separately to a single
T1-weighted file. Oftentimes though, we want to further iterate our pipelines
across subjects. For that, we’ll use a little trick in the SelectFiles interface,
as is explained next.
Iterating across subjects
To iterate across subjects, we only need to apply a couple of modifications to
the SelectFiles node. First, we change the values of our “anat” and “func”
ports the following, respectively:
'data/sub-{sub_id}/anat/sub-{sub_id}_T1w.nii.gz'  # anat port
'data/sub-{sub_id}/func/sub-{sub_id}_task-nback_run*.nii.gz'  # func port
Second, we manually add a new input-port (not a ‘hybrid’ input/output-port!)
with the name “sub_id”. Last, for the value of this sub_id input-port, we
assign a list with subject-identifiers (e.g. ['01', '02', '03']) that
SelectFiles will insert into the template of the “func” and “anat” ports
(see the gif below for a summary).
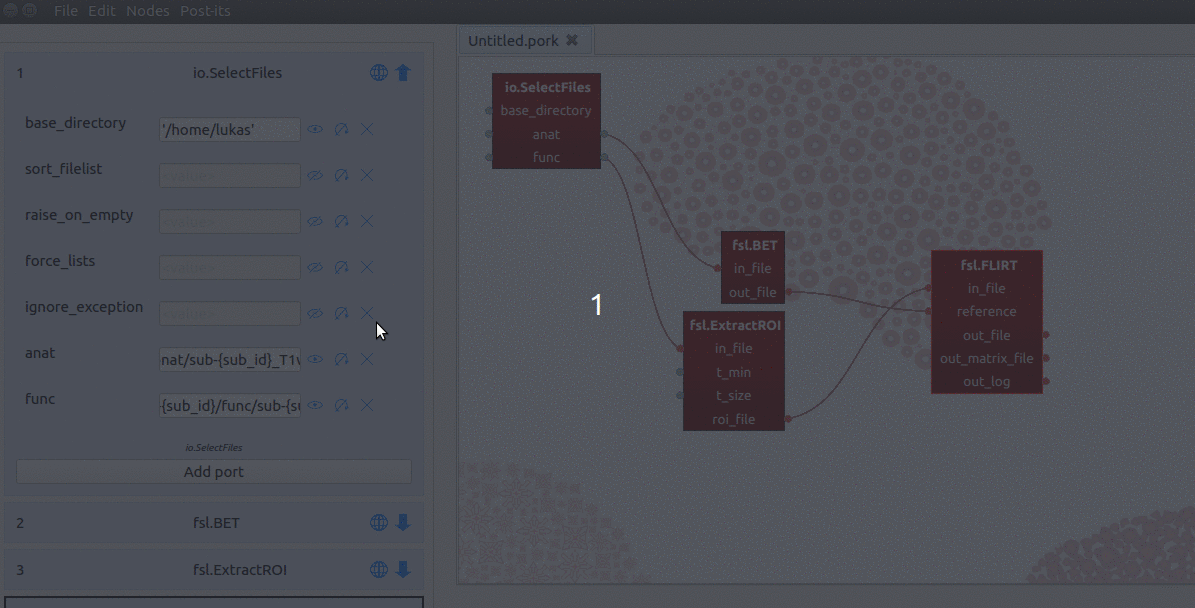
Importantly, SelectFiles will try to insert the entire list (['01', '02', '03'])
into the {sub_id} placeholders at once, and this will crash the SelectFiles
node! Just like we discussed for the ExtractRoi node, we need to make sure
SelectFiles will iterate over the values of the sub_id input-port by
clicking the circular arrow icon next to the sub_id port in the node editor.
By doing so, we ensure SelectFiles will, one by one, insert the values of sub_id
into the template in the func and anat ports. (This process refers to making
sub_id an iterable, in Nipype lingo. For more info on this, check out the
corresponding section
in the documentation.)
By now, we have a fully functioning registration-pipeline that for each subject
calculates the registration from functional to T1-space for two functional files!
This way of selecting files covers probably most of the scenarios. But you should
realize that you can add many more input/output-ports (in addition to func and anat; e.g., fieldmap!)
and placeholders (in addition to {sub_id}; e.g., {session_id}!).
The only thing left to explain is how to write the results of your pipeline - in our case the registration matrices for each file from each subject - to disk again.
Writing outputs to disk using DataSink
Well, actually, all results from your pipeline are (almost always) already on your hard-drive, but they’re stored in an inconvenient place (somewhere buried deep in your ‘temporary files’ folder). You probably want to copy these files to a more convenient location. This you can do with Nipype’s DataSink interface.
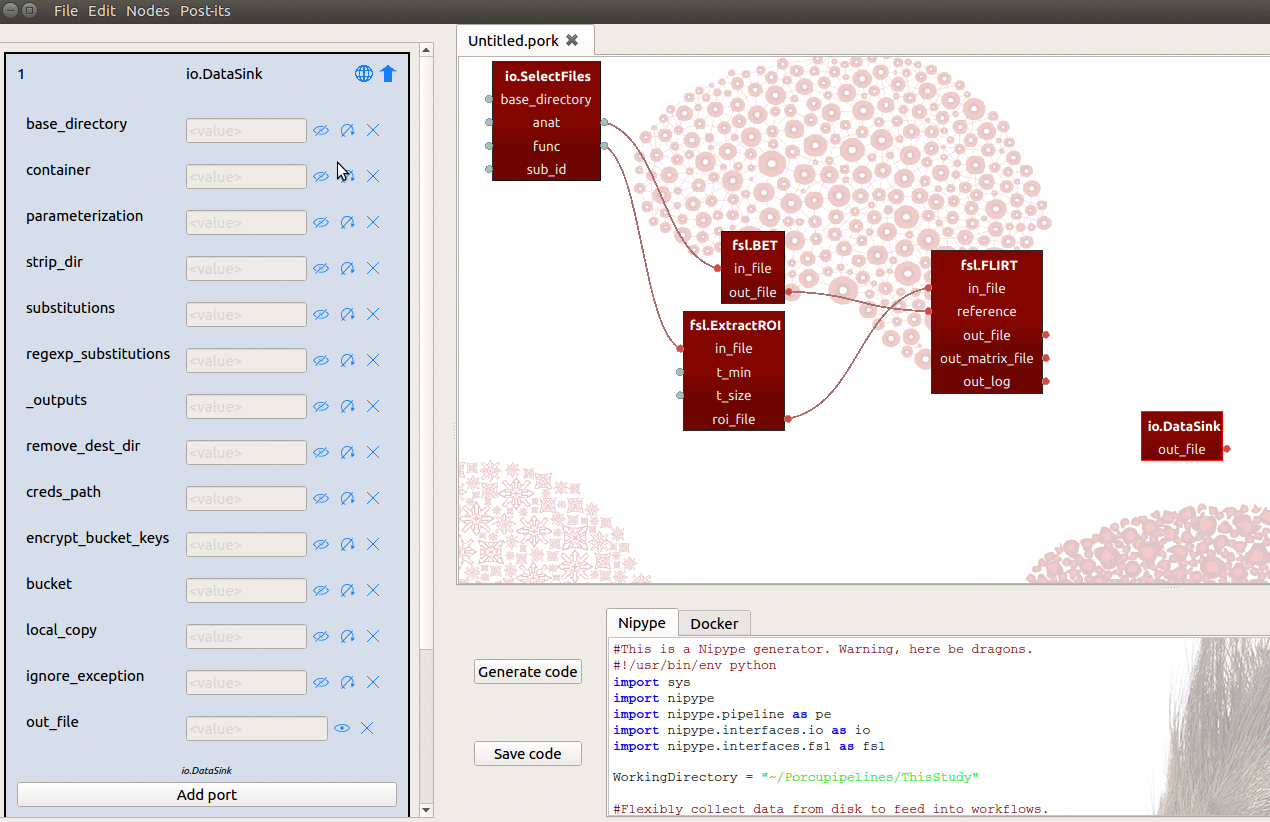
If you initialize a DataSink node in Porcupine, however, you’ll see that it
lacks any input-ports! To sink our results (i.e. the registration matrices) to
a prespecified folder, let’s say ~/results/registration, we need to do two things:
- Set the
base_directoryinput-port to{your_home_dir}/results - Manually add an input-port named “registration”
We can then connect the out_matrix_file output-port from FLIRT to the
new registration input-port from DataSink (see also gif below)!
Tip: If you set the parameterization input-port of DataSink to False,
it will not create any sub-directories for the fields that are iterated across
(i.e., the two functional files and the different subjects).
Of course, you can add as many input-ports to DataSink as you deem useful!
For example, you can create another input-port named skullstrip which you
connect to the out_file output-port from BET, such that the skullstripped
file will get ‘sinked’ to your result-directory! If you would then run this
pipeline with these DataSink configurations (assuming parameterization is set
to False), this will yield the following outputs:
~/results
├── registration
│   ├── sub-01_task-nback_run-1_bold_roi_flirt.mat
│   ├── sub-01_task-nback_run-2_bold_roi_flirt.mat
│   ├── sub-02_task-nback_run-1_bold_roi_flirt.mat
│   ├── sub-02_task-nback_run-2_bold_roi_flirt.mat
│  ...
│   ├── sub-10_task-nback_run-1_bold_roi_flirt.mat
│   └── sub-10_task-nback_run-2_bold_roi_flirt.mat
└── skullstrip
    ├── sub-01_T1w_brain.nii.gz
    ├── sub-02_T1w_brain.nii.gz
   ...
    └── sub-10_T1w_brain.nii.gz