The node editor
Every node in the workflow editor is also represented in the node editors.
As shown in the screenshot below, each node in the workflow editor (here:
fsl.BET and fsl.FAST) gets its own entry in the node editor.
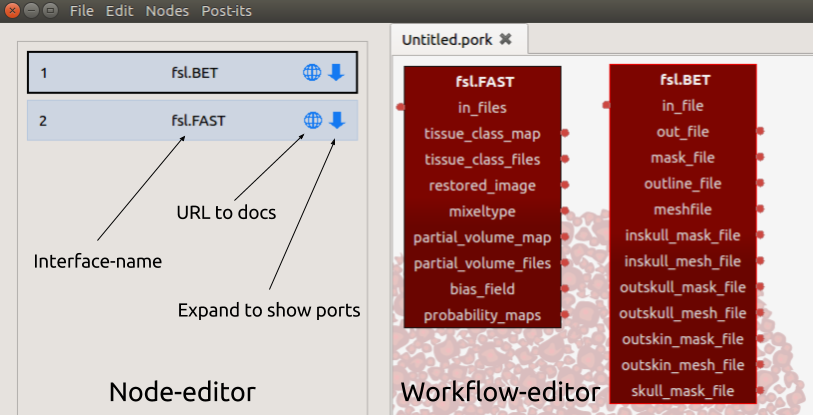
Contents of entries in the node editor
Each entry in the node editor consists of three parts:
- the name of the node (which updates automatically when you edit the name in the workflow editor)
- the URL to the documentation of the node/interface (e.g. the Nipype documentation on
fsl.BET) represented by the blue globe-icon - the blue arrow-icon, which expands the entry to show all of the node’s input and output-ports
When you press the expand-icon (blue arrow), you’ll see all input-ports and output-ports, sorted by mandatory input-ports first, followed by optional input-ports, and finally the output-ports.
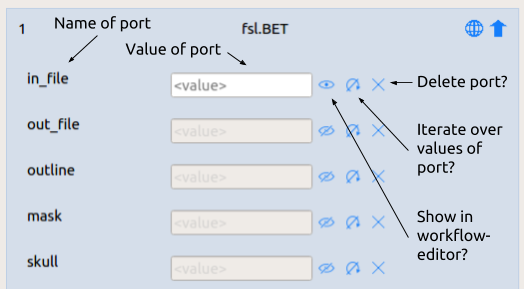
Editing input and output-ports
Each port consists of several elements relating to its functionality or
visualization. At the left of each port, its name is listed (e.g. in_file),
followed by a field in which you can manually enter a value for that input-port.
These manually entered values correspond to hard-coded parameters in your pipeline, which
are thus not dependent on incoming connections from other nodes. As such,
a value for an input-port is either hard-coded or set by a connection
with another node. For example, the in_files input-port from an fsl.FAST
node may be hard-coded (like some_structural_file.nii.gz) or it may receive
a connection from the out_file output-port from e.g. fsl.BET (but not both!).
Note that, upon initialization, only fields from input-ports that are visible
in the workflow editor (like in_file, but not e.g. mask in fsl.BET) are
editable. To visualize an input-port (e.g. mask), click on the blue eye-icon (which
redraws the node in the workflow editor with the new input-port), which will
automatically make the input-port’s field editable.
Note that whatever you write in a port’s field, it should conform to the
syntax/idiosyncrasies of the programming language of the framework you’re using.
Therfore, for Nipype-nodes, use Python syntax and for TvM, use MATLAB syntax. For
example, the other_priors input-port from the fsl.FAST node expects a list
of three strings referring to alternative prior images. Adhering to Python’s
syntax for constructing a list, you’d fill in something like:
['img1.nii.gz', 'img2.nii.gz', 'img3.nii.gz']
Also, notice that only the fields from input-ports are editable in Nipype-based nodes; output-ports are not. This is because Nipype was designed such that output-ports are not directly editable. (For other frameworks, like TvM, however, this is not necessarily the case.)
Other options (iterate and remove input-ports)
Then, to the right of the eye-icon you’ll see two other icons: a circular arrow and a cross, which correspond to options to make an input-port iterable or to delete a particular (manually created) input-port, respectively. We’ll leave those functionalities for now, as they are explained in more detail in other parts of the documentation (for more info on iterable input-ports, check the section on iterables and mapnodes; for more info on manually created input ports, check the section on file I/O).
Now you know how to build pipelines by initializing and connecting nodes in the workflow editor and further customizing/adapting your nodes in the node editor. But this does not give you anything to really execute your pipeline; for this, we need to look at Porcupine’s “code editor” in more detail in the next section!